Turn Your Unused Basement Into a Private Wellness Retreat
Have you ever dreamed of a personal sanctuary at home to unwind after a demanding day, recover from an intense workout, or host intimate wellness gatherings? Transforming your basement into a private spa offers a practical solution, utilizing often-overlooked space to craft a year-round retreat. This guide provides detailed steps, cost estimates, design insights, and essential considerations to help you create a functional and luxurious wellness haven.
Why Choose a Basement for Your Wellness Space
A dedicated wellness area in your basement not only enhances your daily life but also boosts property value. Homes with specialized wellness features often command higher resale prices, according to national housing trends. Beyond financial benefits, regular access to elements like hydrotherapy or quiet meditation zones can reduce stress, improve sleep quality, and positively impact work and family dynamics. With inherent privacy and climate control, basements are naturally suited for such transformations.
Emerging Trends in Basement Spa Design
Consider integrating these modern trends to elevate your space:
- Biophilic Elements: Incorporate living walls, moss panels, or LED lighting that mimics natural daylight cycles to foster a connection with nature, even underground.
- Smart Technology: Opt for app-controlled temperature settings, voice-activated aromatherapy diffusers, and synchronized lighting and sound systems for a seamless experience.
- Sustainable Materials: Use reclaimed wood, low-VOC finishes, and energy-efficient infrared saunas to minimize environmental impact.
- Multi-Sensory Features: Add chromotherapy lighting, binaural audio, or virtual reality meditation options for a customizable retreat.
- Adaptable Layouts: Design with movable partitions and modular furniture to switch between a spa, yoga studio, or private office as needed.
Step-by-Step Planning for Your Conversion
Assess Your Basement's Potential
Start by evaluating the space for critical issues. Hire a certified inspector to check for moisture and hydrostatic pressure, as waterproofing is essential. Ensure ceiling height is at least seven feet for comfort, opting for low-profile fixtures if clearance is limited. Consult a structural engineer to verify the floor can support heavy features like hot tubs, which can weigh thousands of pounds when filled.
Define Your Wellness Goals
Determine the primary purpose of your retreat and select features accordingly. For stress relief, prioritize sound-absorbing panels and dimmable lighting. If recovery is the focus, install a hydrotherapy tub and an infrared sauna. For social or holistic use, consider lounge areas or steam rooms with aromatherapy controls.
Budget and Timeline Expectations
Plan for these approximate costs in 2024 for a full conversion ranging from 45,000 to 95,000 dollars:
- Waterproofing and foundation work: 5,000 to 12,000 dollars.
- Flooring and tiling: 8,000 to 20,000 dollars.
- Hydrotherapy tub or plunge pool: 6,000 to 15,000 dollars.
- Infrared sauna (two-person): 3,500 to 7,000 dollars.
- Smart lighting and audio-visual systems: 4,000 to 9,000 dollars.
- Labor (designer and contractor): 20 to 35 percent of total project cost.
Allocate an additional 10 percent for unexpected expenses. Expect the project to take three to six months, depending on permit processing and project scope.
Key Design Elements for Lasting Appeal
Focus on these essentials to ensure functionality and style. Layer lighting with warm tones for relaxation and cooler tones for energy, using circadian-friendly controls to support natural sleep patterns. Select slip-resistant porcelain tiles or waterproof engineered wood for wet areas, and install heat recovery ventilators to maintain air quality amidst humidity. For water features, insist on recirculating filtration systems and separate wet and dry zones with glass partitions.
Execution: From Concept to Completion
- Develop a mood board with must-have features and inspirational visuals.
- Confirm feasibility with structural and waterproofing inspections.
- Collaborate with a basement renovation designer for 3D renderings.
- Secure necessary permits for plumbing, electrical, and mechanical updates.
- Install waterproofing membranes and drainage systems.
- Complete rough-in work for utilities, leaving room for future upgrades.
- Finish with tiling, fixtures, and smart controls, testing all systems thoroughly.
DIY or Professional Help
Certain tasks demand expertise. Always hire certified contractors for waterproofing, structural reinforcement, and electrical work, ensuring permits are obtained. For tile installation or carpentry, experienced DIYers can manage smaller tasks, though complex finishes warrant professionals. Smart home setups may be user-friendly, but intricate systems benefit from specialist input.
Maintaining Your Wellness Retreat
Preserve your investment with regular care. Weekly, monitor humidity levels (keep between 45 and 55 percent) and clean surfaces. Monthly, inspect water system filters and sauna components. Schedule annual professional checks for pumps, heaters, and waterproofing membranes to prevent issues.
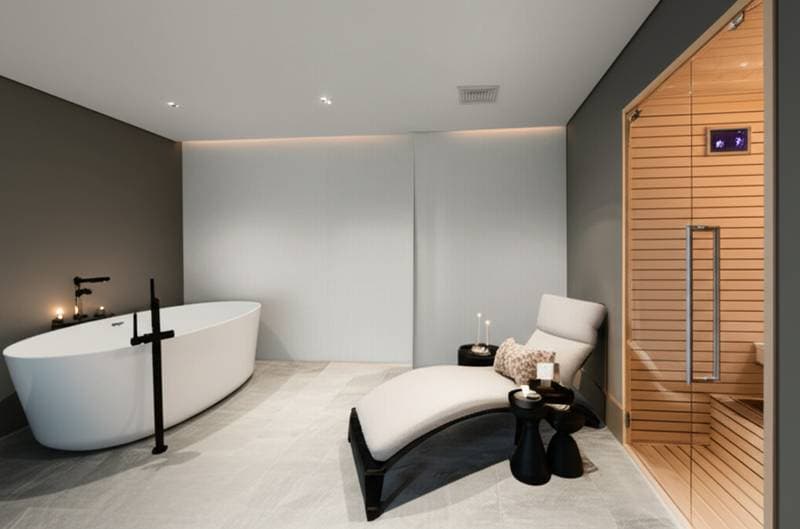
Visualize the Transformation
Imagine a 1,200-square-foot unfinished basement, once damp and unused, now a 1,150-square-foot wellness retreat. Picture a compact infrared sauna, a six-person hydrotherapy tub with color therapy, and a vibrant living wall, all controlled by voice-activated relaxation modes. Homeowners often note increased relaxation time and a significant boost in property appraisal after such upgrades.
Launch Your Basement Spa Project
Begin with a realistic vision and a thorough site assessment. Address moisture or structural concerns with professional evaluations before proceeding. Focus on a single, high-impact feature like a sauna to start, phasing in additional elements over time. With meticulous planning, your basement can become a cherished wellness retreat, delivering daily comfort and lasting value.